Uncovering Family History: Fun Genealogy Activities for Kids
In today’s world, where memories can easily fade into obscurity, engaging children in genealogy activities is an exciting way to preserve family history. These activities not only create lasting bonds but also help kids discover their roots and understand their identity. From interviewing relatives to restoring old photographs, there’s a world of exploration waiting to be uncovered.
Here’s how you can inspire the next generation to connect with their heritage.
1. Interview Family Members
One of the most impactful ways to engage kids with genealogy is through storytelling. Encourage them to interview grandparents, parents, or other relatives about their life experiences, family traditions, and memorable events. This not only preserves these stories but also fosters a deeper connection with family history. Kids can prepare a list of questions beforehand to make the process more organized and meaningful. Recording these interviews can turn into a treasured keepsake that can be shared with future generations.
2. Create a Family Tree
Building a family tree is a fantastic visual representation of one’s heritage. Kids can use colorful paper and art supplies to craft a family tree that shows their ancestors and relatives. This activity not only teaches them about their lineage but also encourages creativity. As they work on their family tree, children can learn about relationships and how their family history shapes their identity. Once complete, they can display their family tree at home, sparking further discussions about family stories.
3. Restore Old Photos
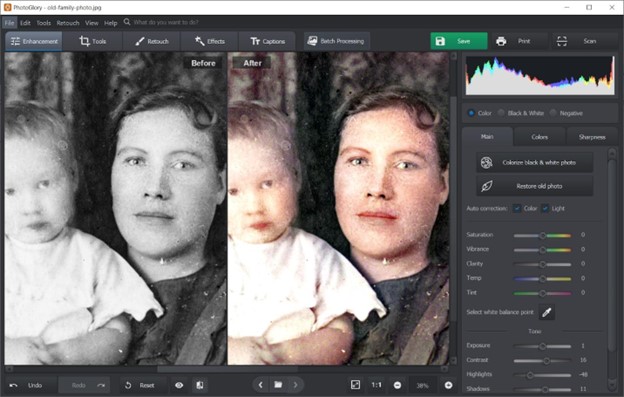
Old photographs often tell stories of the past, but over time, they can become faded or damaged. Engaging kids in photo restoration is a rewarding activity that combines art and technology. To do that, you can use PhotoGlory — a user-friendly program that has inbuilt AI instruments allowing the user to restore old photos and colorize them automatically. It also knows how to take care of scratches, cracks, creases, stains, and water damage. Alternative options are MyHeritage or FixMyPics. They, too, can digitally restore cherished family photos and then share the enhanced images with relatives. This not only preserves the past but also brings a sense of accomplishment to young family historians.
4. Visit Historical Sites or Cemeteries
Taking kids to visit historical sites, such as old family homes, cemeteries, or local landmarks, can create a tangible connection to their ancestry. Discuss the significance of these places and the stories associated with them. Encourage children to take notes or sketch the sites, fostering their observational skills and encouraging them to ask questions about their family’s history. Visiting cemeteries can be particularly powerful as it offers a chance to learn about past generations and reflect on their lives.
5. Document Family Recipes
Food is a universal connector, and documenting family recipes is a delightful way for kids to engage with their heritage. Encourage them to gather recipes from relatives and learn how to prepare traditional dishes. This activity not only preserves culinary history but also instills a sense of pride and continuity. Kids can create a family cookbook filled with stories behind each recipe, which can be cherished for years to come.
6. Craft a Family Storybook
Combining storytelling with creativity, kids can create a family storybook that documents their heritage. They can write down family anecdotes, legends, and favorite memories, alongside illustrations or photographs. This activity helps kids articulate their family history in their own words, enhancing their writing and storytelling skills. The finished storybook can serve as a family heirloom, passed down through generations. Frame one of your favorite photos and display it on a wall in your home.
7. Explore Old Technology

Introduce children to the technology their ancestors used. This can include anything from rotary phones to typewriters. Kids can research how these devices worked and their significance in family history. You can even host a ‘technology museum’ day at home, where children can demonstrate their findings to family members. This activity highlights the progress of technology over generations and provides context for the lives of their ancestors.
8. Engage with Online Genealogy Resources
There are numerous online resources dedicated to genealogy that kids can explore. A number of websites offer engaging activities tailored for younger audiences. Kids can learn how to navigate these platforms, search for their ancestors, and uncover fascinating family stories. By utilizing these resources, children can take ownership of their genealogical research, making the experience both educational and empowering.
9. Join a Family History Group or Workshop
Many local libraries and community centers offer workshops on genealogy that are kid-friendly. Participating in these events can provide kids with valuable skills and connect them with other young genealogists. This sense of community can inspire them to pursue their family history further and develop friendships based on shared interests.
10. Organize a Family History Day
Creating a special family history day can be an exciting event. Invite relatives to come together for storytelling, sharing photographs, and discussing family heritage. Kids can take the lead in organizing activities such as quizzes about family history, games, or even a family tree contest. This gathering not only strengthens family bonds but also immerses children in the richness of their ancestry.
Conclusion
Engaging children in genealogy activities is a wonderful way to help them connect with their roots while developing valuable skills. By incorporating interviews, creative projects like photo restoration, and hands-on experiences, kids can cultivate a deeper understanding of their family history. These activities not only preserve memories but also empower the younger generation to carry forward their family’s legacy. Embrace the adventure of uncovering family stories and watch as the next generation grows into passionate custodians of their history.